In this post on how to make instructional videos for martial arts and self-defense, I’ll cover some of the basics and typical errors to avoid. My goal is that with this information, you can improve the quality of your recordings right away. You don’t have to be a professional with expensive equipment to make good quality instructional videos. Nor do you need Hollywood-level post-production, providing you take into account these recommendations. With some forethought, planning, and experimentation, you can quickly make progress.
FYI: I made my first instructional video over 15 years ago with Paladin Press. I worked with them regularly before they closed down and have produced numerous ones myself. For the past few years, I have made over 150 instructional videos for my Patrons. There are people who are better at it than me, obviously, but I do have plenty of experience and will share it with you. Use what works for you and discard the rest.
Let’s get started.
Planning an instructional video
Goal
First things first, what is the goal of the video? Detailed instruction of a specific technique? Highlighting the flow of a drill? Showing a kata or form from beginning to end for reference? To get a good finished product, you need to work towards it from the beginning: you can edit the footage to improve it but it is difficult to show what you didn’t record. Re-shooting is not always possible and pick-ups only go so far. So save yourself some time and think before you start:
What do you want to teach with this video?
Determine that first and then you can proceed.
Obviously, you can have multiple goals at once, that’s fine. But then adjust the rest of the planning accordingly. I would suggest keeping things simple if you are new to making instructional videos. As you get more experienced, you can take on more complex projects.
Script or Outline
Now that you know the goal of the video, it’s time to specify all the elements that need to be in it. Let’s say you make an instructional video about how to throw a straight punch. Here are some of the elements you might want to include:
- Introduction.
- Theory and context of the technique.
- Slow demonstration of the technique for reference.
- Highlighting the individual components of the technique: legs, left arm, right arm, torso, footwork, etc.
- Demo with a partner at different speeds.
- Demo on a heavy bag or focus mitt.
- Common mistakes.
- Final thoughts and outro.
Add and subtract to such a bullet list depending on your goal. Also, go into as much or as little detail as you need and create sub-bullets if that works for you. For some scenes, I have everything written out but for others, it’s just a word or a sentence. It all depends on the individual video or the series I’m making. For instance, this is the beginning of the outline I used for my Hardcore Heavy Bag Training instructional video:
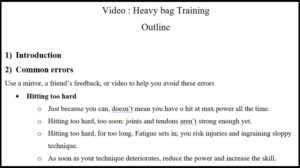 I rehearsed the introduction, knew exactly what to say and we shot it in one take. For the common errors, I knew which techniques I would use to demonstrate them and how to explain things.
This is just one example of how to do it. Develop a way that works for you, but you do need to plan.
Some additional points:
- The above bullet list for that hypothetical straight punch video needs some more nuance. As is, this can be a 10-minute or a one-hour long video. It depends on how much detail you want to include. Or you could make each individual bullet its own video in a long series of short installments. Or you could take one, two, or three bullets at a time for a bunch of 15min. segments. There are tons of options that once again boil down to deciding the goal of the video.
- I’ll talk more below, but it is helpful to think of camera angles and framing in general terms at this stage. E.g. if you know you need lots of wide shots, then you also need a location that allows the camera to be placed back far enough to get the framing right. For close-ups, this isn’t as relevant but all of a sudden, lighting becomes more important.
- People can pause the video, rewind, and fast forward. When you make instructional videos, don’t show everything twice unless there is an addition to the repetition that conveys new information.
- Rehearse. Spend enough prep time actually performing and talking the way you will during the shoot. It is very much like teaching a class, but still different enough to be its own thing. Some people are naturals, most of us need the practice to not look like idiots…
- No matter what you do and how hard you try, some people will hate your video. That’s fine; then it’s not for them. Grow a thick skin and just keep working on trying to get better at it.
Location
This is one of the hardest things in my experience. When making an instructional video, you need enough room for a variety of shots, no distractions, a good background that lets the viewer see you clearly, sometimes mats for a partner to fall on, etc. Often, you’ll have to make compromises, so consider your priorities before picking a location. Here are some elements to look for:
- Background. Generally speaking, you don’t want a busy background (lots of elements, people moving around, etc.) as that pulls the viewer’s attention away from whatever you want to show them. When you make instructional videos, less is more and sober backgrounds are best. A wall of your house or even your garage door can be better than setting up in the street with cars passing by. You might have to scout for locations and ask permission in some cases if you don’t have what you need at your place. Once you get better at making videos, you can use backgrounds that are a bit more crowded, but that requires both setting up your scenes and good camera skills. Finally: do not use chroma key. Unless you are an experienced cinematographer and editor, just don’t.
- Weather. For an outside shoot, you need steady weather. That doesn’t necessarily mean sunshine; it can be cloudy but then it’s better if it’s cloudy all day. This means lighting will be more consistent and therefore you’ll have a better end product. You can fix some lighting issues during editing, but it is best to avoid them altogether. Another aspect is indoor shoots and the impact weather has on your location. E.g.: if it starts raining hard, the clatter on the windows or roof might be on the audio track. If it’s blistering hot and you don’t have airconditioning, you might sweat profusely and that fancy t-shirt you ironed so well to look sharp now has huge sweat stains underneath your armpits…
- Unwanted extras. Especially when shooting outdoors, people can walk in front of the camera, stand at a distance in the background as they watch you, be loud and mess up your audio, etc. The same goes for animals who tend to do their own thing and don’t care what you’re doing. When shooting indoors, even when clearly labeling that you’re making a video, people will still open doors and peek inside, make noise, and overall mess up your shots. In studios, things are usually better, but even then the occasional absent-minded person walks in on a scene in progress. Try to minimize these complications as much as possible during your location selection process.
- Noise control. You want as little ambient noise as possible so your voice can be recorded clearly. Pay attention to electric and electronic devices humming or making other distracting noises. Switch them off when possible and don’t forget to silence your phone. Not just switching off the sound but also the vibrate function. When you can’t control sound, voice-over during editing is the only solution. I’ll talk about that more below.
Equipment
There is the equipment you need and then there’s what you want; the two are not the same. If you have money to spend, then go ahead. But if your videos are for social media and similar purposes, then there really is no need to spend a gazillion dollars to make a fully-functional instructional video. Here is what I use:
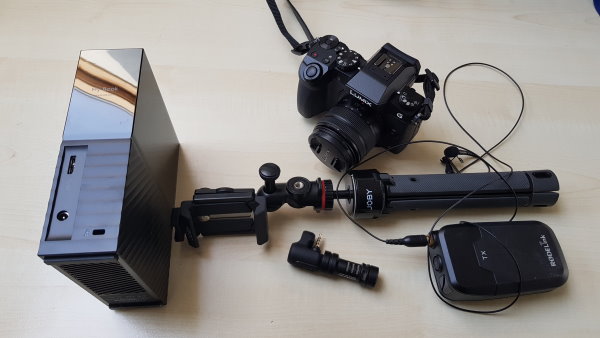
- An assistant: Not equipment per se obviously, but if somebody can push the record button on and off for you, and check if you are placed correctly in the frame, that goes a long way in making things easier and faster.
- Camera: On average, modern smartphones have really good cameras and these are perfectly fine for good quality videos, providing you use them correctly. I use a Galaxy S8 for most of my social media stuff. It can shoot up to 4K and creates good quality videos. For the instructional videos I sell online, I use the Panasonic Lumix G7 I received as a gift from an anonymous benefactor. It is very good.
- Memory card/storage: You will generally shoot in full HD at a minimum, perhaps even in 4K. That means huge video files, so you need a lot of storage on both the camera and afterward to edit and store final files. Invest in a good quality SD card to not only have plenty of space for the files, but also one that has fast read/write speeds and is compatible with your device. I’ve mainly used SanDisk and Samsung cards. For final storage, an external drive is not a luxury. Thanks to my Patrons, I recently upgraded to a WD 10TB My Book and it has been a pleasure to work with. Fast and plenty of storage space.
- Stand/tripod: Regardless of which camera you use, it needs a stable base, which means a tripod. I have used a bunch of different ones and they all have benefits and drawbacks. The JOBY GorillaPod Mobile Mini is great for quick and dirty work. You can put it on a chair, box, or anything else you might have to get the right height for a good camera angle. The Joby GripTight PRO TelePod is more versatile and served me well for a long time. It’s more expensive, but a LOT more versatile and even has a small remote control to start and stop shooting. For DSLR cameras, try this tripod. It is still reasonably priced and very versatile. I suggest investing in a good tripod right away if you plan to regularly make instructional videos. It makes a drastic difference in the end result.
- Audio: This is a big one. Instructional videos have the word “instruction” in them. That means people have to hear you when you talk. Unless you do voice-overs, the quality of your camera’s microphone is key here. Most phones and cameras have pretty lousy microphones and you need to invest in an upgrade. For phones, the Rode VideoMic Me is probably the best product out there. I’ve used it for years and it works very well. For the other shoots, I use the RodeLink Filmmaker, which is expensive and a bit bulky but has a great sound.
- Lighting: If you have good natural light (outdoors or big windows), that’s perfect, but you want stable light just as much. If the clouds alternate drifting in front of the sun, you’ll have a weird video with very bright and then darker scenes switching all the time. Try to avoid that. I use Falcon Eyes softboxes similar to these for indoor shoots. They are not cheap, but the quality is great. That said, getting studio lighting right is tricky and takes practice. Just do the best you can.
- Computer/laptop: You can edit videos on your phone but I would not recommend it for most projects. I edited this one on my phone and as you can see, it is basic but it works. The transition between scenes is the only effect I added, but it was a lot of work to cut the scenes to length with my thick fingers on a small screen. A tablet is slightly easier, but still way too work-intensive. A desktop is best (better hardware) but I’ve been using a laptop since my old desktop died on me. My ASUS ROG is now more than two years old and has a hard time with some of my bigger projects, but for videos under 30min. long, it is still good. If you have a newer computer with decent hardware (mostly a good CPU, lots of RAM and a good video card), you should be fine. I’ll comment on editing software below.
- Tablet: Not strictly necessary, but if you already have one, it can be pretty handy. I have a Samsung Galaxy Tab S3 that I use to look at my script. For larger projects, I use my laptop, but for the rest, a tablet works fine. That way I don’t have to print out my script (and potentially lose it to a gust of wind when outdoors…) and can make notes in it about inevitable changes that come up during the shoot.
- Studio Microphone: For voice-over work and also my podcast, I have been using the Blue Yeti for years now. It is not cheap, but bar none the best one price/quality wise and it is USB plug-and-play, so no need for extra hardware. Don’t forget a pop filter though, because recording without one is a surefire way to have high-quality sound that is too annoying to listen to.
- Accessories: Depending on your chosen equipment, location, and length of the shoot, you might need a few additional items. Stuff like food and water, extra clothing, towels to wipe your sweat off, reserve batteries, a power bank, extension cord, etc. Remember the military adage of Proper Planning Prevents Piss-Poor Performance. It applies in spades here.
- Clothing: Another critical aspect that people get wrong so often. In short: keep it simple. You want enough contrast with the background so you stand out but not that your image screams off the screen. Do NOT use striped clothing, ever and try to have matching color combinations and avoid flashy colors. Preferably, everything is evenly colored with enough contrast to distinguish your limbs left from right. Also don’t have different clothes in each shot. Take into account that you are likely to sweat as this is an instructional video and you will be active.
These are the most important considerations and though this list isn’t complete, it will get you started.
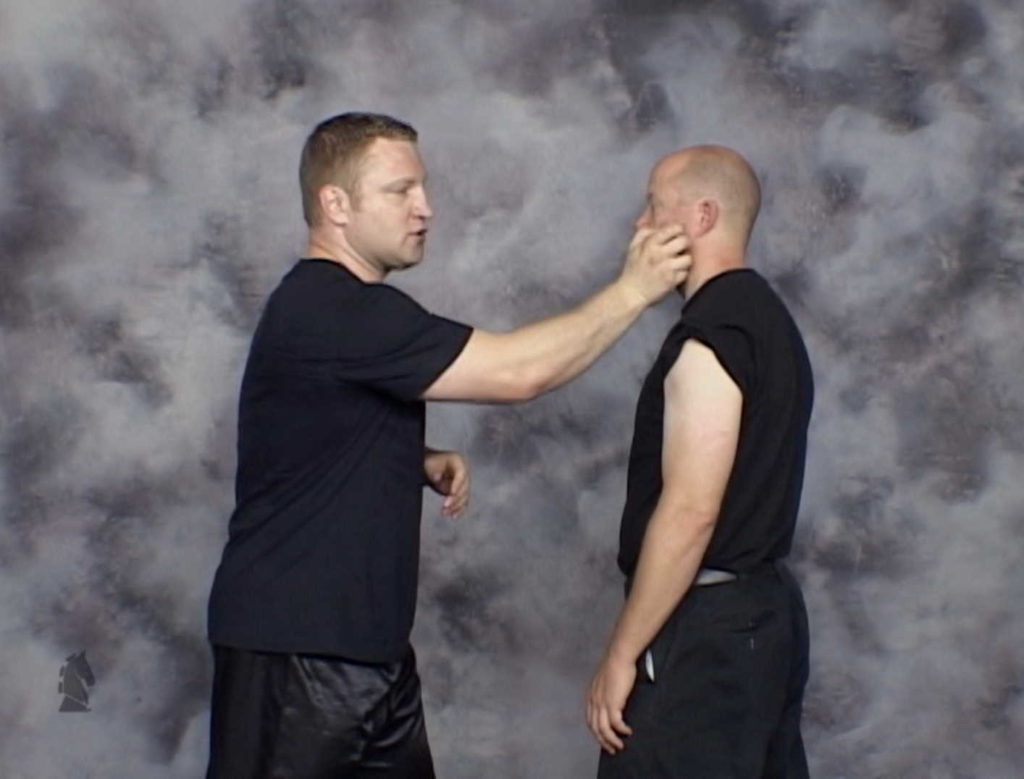
Here’s an example of a few of these things in action. This still is from my Combat Sanshou: Tiger and Snake video, one of the last I did with Paladin Press:
Notice the following:
- The background is a bit lively but not so much that it distracts.
- Our clothes don’t clash with the background and we are still clearly visible.
- Brian and I are in similar clothing, which gives consistency to the scene. Had he been in a red gi or t-shirt and muay Thai shorts, the colors and styles would have clashed.
- My t-shirt already has plenty of sweat stains, but because of the type of fabric and the color I picked, you can hardly tell. The Paladin Press studio was in a large, converted garage that was isolated for noise. That also isolated it for heat and trapped it inside. I shot all of my videos there during Summer and the sun would beat on the garage door and heat up the room. There was airconditioning, but it had to be switched off for every scene because it made too much noise. I learned quickly to choose the right clothes and not mess up takes…
Filming an instructional video
With the previous preparations done, you are now ready to start filming. Set the date, make sure you have all your equipment ready (batteries charged, of course…), and then you can get started. Now’s the time for the actual magic to happen and truly make your instructional video. Here are some things to consider:
- Sequence: You don’t have to shoot in sequence, you can shoot scene 15 first and then 7 and then the first one on your list. Depending on the lighting conditions, availability of the location, etc. you might have to roll with the punches. If so, keep a list of which scene you did first to make editing easier afterward. Personally, I prefer shooting in sequence because that’s how my mind works, but I have switched up the order loads of times due to unforeseen circumstances.
- Framing: Learn about the different types of shots and use the appropriate ones for each scene. You can use multiple shots for the same subject matter: filming the technique from further out to demonstrate it in full and then zoom in for the instructional part. Poorly framed videos are horrible to watch, no matter how good the instruction.
- Framing trick: If your camera is good enough, shoot wide in 4K and then you can crop during editing to frame everything the way you want without losing quality. For some things (when you move around a lot, that is the best solution anyway. More below.
- Mark the spot: Set up the camera in a fixed spot, check where you need to be in front of it to get the shots you need, and then mark that spot on the floor. Use duct tape or anything else that won’t move around and then you won’t go out of frame or have inconsistent composition between scenes. If you do use duct tape, make sure it matches the colors of the ground so the camera doesn’t pick it up.
- Camera angles: Learn about camera angles and for the love of all that is holy, stick to neutral ones. Do not use fancy angles because it looks cool. It doesn’t. It also doesn’t make you innovative because it’s all been done before. Stick to basics and clarity so the instruction is clear to see. Most of all: make sure your camera is level so the shots aren’t ruined and you only notice it when you edit. Some tripods have a level bubble to help you with that.
- More angles: Orient yourself the right way so the camera can spot what you want to show. This is difficult at first, but crucial as the wrong camera angle makes your footage useless. Here’s how to avoid that: when you do a test video, perform your technique facing the camera, then turn 45° to the left and do it again. Repeat this process until you face the camera again. Review the footage, see which angle shows what exactly, and then add the camera angles in your script to make sure you don’t forget. E.g.: if you want to explain what your right hand is doing in the technique, but the camera can’t see it, then the viewer won’t understand what you mean. With practice, you will come to do this instinctively.
- Speed of movement: Motion blur is an issue with some cameras, so do a test video first to see what the results are when you perform the technique at full-speed. Composition also tremendously influences perceived speed: Orient sideways to the camera and throw your fastest punch. First, record it in a wide shot and then a medium close-up. The difference is huge, despite it being the same technique. Camera angles, framing, and orientation can make you look both good and bad. There is no other way but to experiment to figure it out.
- No need for a clapper: Professional shoots use a clapper to mark scenes, I don’t. I start each scene by talking into the camera with a small description. Then I go to the mark on the floor, focus for a few seconds, and am ready to go. When I review the files and the first thing I hear is “scene 15 – eye gouge left” I know exactly what’s on the video.
If you have an assistant, they can take notes of the scenes you shoot and do an intro like I do at the beginning, but afterward, they absolutely have to be quiet. They stand close to the camera, so all their sniffing, panting and mumbling will be recorded. That includes when they act as a clapper. Instead of saying stuff like “You can start now” or “Recording!” agree on a hand signal like a thumb’s up as your cue to start. It makes your video come off amateurish if you forget to cut out that part and I can’t tell you how many times I’ve seen that happen…
- Keep rolling. Depending on what kind of scene you’re shooting, you don’t have to start over when you make a mistake. When that happens, I wave at the camera (I rarely have an assistant) and make a rolling gesture with my arms before I reset and start again. You can repeat this process as necessary. This way, when I scroll through a file during editing and see those gestures, I know there is something that needs special attention.
- Pause at the end. Wait a few seconds at the end of a shot before you move away. You can always cut those extra seconds in editing but you can’t add them if you need them. One of the reasons is transitions from one scene to the next: creating that effect eats up a few seconds in total from both clips.
- Sound direction. Sound has direction. Always speak towards the microphone of the camera or it either won’t be recorded or be of such poor quality as to be useless. Depending on the quality of your microphone, you might also have to speak louder than normal.
- Multiple takes: Digital video is cheap and endless until you run out of storage space. So don’t worry if you have to shoot scenes again to get them right. That said, try not to waste time by constantly re-shooting scenes or you’ll never finish the project.
- Multi-purpose shooting: This takes some experience, but after a while, you start thinking in finished videos and get better at planning everything. Then you can shoot in such a way that you can use the video for multiple purposes: a full instructional video as a base. Use that one to make a trailer. Shoot in 4K so you can make still pictures for covers and promotional purposes. Center the framing for Instagram (which prefers a square format), etc. Don’t worry if you can’t see all that right now, give yourself time to grow into this. Eventually, you can save a lot of time by just thinking about a video project differently.
Editing an instructional video
The editing room is where you take all the individual video files you shot, chop off the pieces you don’t need and then massage them into the final shape you want. This is not difficult per se, but it is a skill you need to learn and it takes practice. There are also many different editing styles and it might take you a while to find yours. Start with a clean, basic edit and then slowly add more difficult techniques. Some things to consider:
- Software: The right software for your needs makes everything go so much smoother. I’ve used Cyberlink Power Director for years now and am very comfortable with it. It has the right balance between features, power, and price for my needs. There are free programs available, but I haven’t tried those in a long time. That said, most computers come with a basic video editing program pre-installed, so give that a try if you want to start right away.
- Cut-split-transition: These are the basic functions you will use the most. You cut away parts you don’t need. You split a file into separate scenes you do want to keep. You use transition effects to make it a smooth viewing experience. The first two are self-explanatory. For transitions, don’t get fancy. Stick to a basic fade transition at first as it is clean and easy to do right. Explosions and flashing stars are not cool. They also draw attention away from the content and towards the effect. At worst, they are annoying and people stop watching. You’re supposed to make the video instructional first and foremost. Entertaining people come last as it is incredibly easy to get this wrong and turn off your audience.
- Titles: Titles are reminders for people to keep track of what’s going on. They explain what the viewer will see next and therefor provide context. Once again, keep things simple. Use a clean background and a font that doesn’t scream at people and most of all, DON’T USE ALL CAPS. You can also use titles without a background to “write” on the footage. This can highlight certain concepts, create bullet lists of what you’re explaining or you can even point to things by writing ==> and then placing the title box near whatever you want to emphasize.
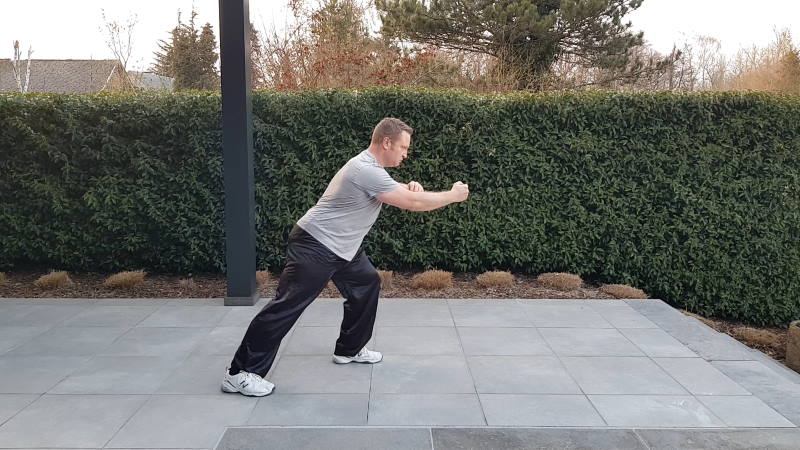
- Crop: This is tricky. In short, you cut away a part of what the camera captured and basically zoom in. This lets you correct small errors of framing without having to reshoot a scene. However, cropping means you cut pixels from the image and end up with a lower resolution. Sometimes, that’s not a big deal but at worst, your cropped video looks like crap. That is why shooting in 4K can be so handy: cropping such a video usually leaves you with enough pixels for a full HD resolution final video. The downside is that 4K video files are huge. That’s why planning your shot is so important: do it right and you don’t have to crop much, if at all.
Here’s an example from my upcoming Online Tai Chi Chuan training site. This is the original framing in 4K:
 Now here’s the cropped version that frames the technique better:
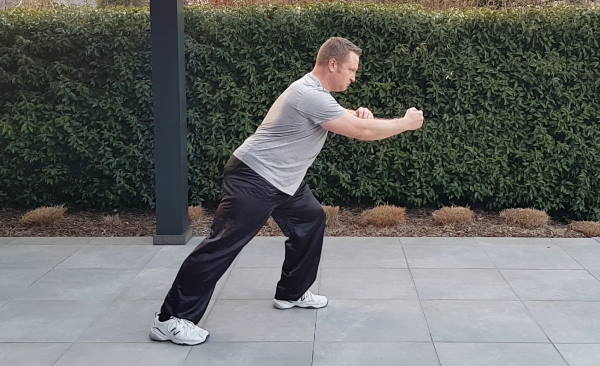 Both pictures are downsized for faster download on my blog here, but at normal size, the resolution is just fine.
- Volume check: Most software allows you to enhance the sound of your videos. There are limits to how much you can improve it, but raising the volume of the audio track is usually possible. Make sure to always preview your files to check the volume and adjust where needed. Viewers hate it when they can’t hear what you’re saying even after turning the volume of their device to the maximum setting.
- Voice-over: If you planned to do so you can do voice-overs during editing. Use the best microphone you can get and don’t forget to mute the video file before starting your voice-over. Go to the quietest room you have and switch off all electronic devices. You can do as many takes as needed because now you are no longer under a deadline due to outside influences.
Final tips:
- Study. Study videos on Youtube that are the kind you want to make. Look at all the above-mentioned elements and see how those videos tackle them. Use them as examples to learn and emulate.
- Test first. Shoot a video first and see what it looks like on a large screen. Many cameras crop the image as they record, so what you see on the screen of your phone/camera is not always what you eventually get. Better finding out beforehand instead of after days of shooting a long video… Same thing for other aspects like audio quality/volume, angles, etc. Just do a quick and dirty test and then watch the footage on your monitor or TV screen. List which elements need work and adjust accordingly
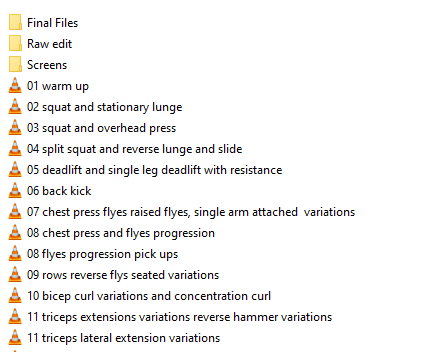
- Filing system. Create an orderly and logical (for you) filing system. That isn’t a big deal at first, but when you have dozens or hundreds of files, it is easy to lose track and even delete critical files by accident (hello, external back-up hard drive!) Here is an example of my latest project, Resistance Band Full-Body Home Workout:
- Don’t give up. Keep trying and learning and eventually, you’ll get better at the whole process. It’s at the same time relatively easy and very complex, like many skills worth pursuing…
I hope this how-to guide was helpful for you.
Good luck!


leon says
coooooooooooool